This section reports works I successfully completed for my clients. Navigate the sections:
Technical Articles
This section provides a list of my best articles, grouped by client.
Bright Data
Bright Data is a leading company in the field of web scraping. Read my articles:
- How to Bypass CAPTCHAs With Puppeteer
- Web Scraping With Jupyter Notebooks
- Web Scraping With Selenium Wire in Python
- Scrapy vs. Requests: Which One Is Better For Web Scraping?
- Scrapy vs Pyspider: Which One Is Better for Web Scraping?
- How to Rotate Proxies in Python
- A Guide to Data Analysis With Python in 2025
- Web Scraping With Parsel in Python: 2025 Guide
- Web Scraping With Scrapy Splash: Step-By-Step Guide
- How to Use Web Scraping for Machine Learning
- The 5 Best CAPTCHA Proxies of 2025
- What Is Supervised Fine-Tuning in LLMs?
- What Is Zero-Shot Classification?
- Web Scraping With Botright: 2025 Guide
- What Is MoE? A Deep Dive Into a Popular AI Architecture
- Fine-Tuning Llama 4 with Fresh Web Data for Better Results
- AI-Powered Web Scraping in Dify via a No-Code Workflow
- Using Dify and Bright Data for Web Search
- How To Fine-Tune GPT-4o With a Web Scraper API Using n8n
- Top 10 MCP Servers to Improve Your AI Workflows
- Best Web Scraping Methods for JavaScript-Heavy Sites
- Web Scraping Workflow with Pipedream and Bright Data
- Top 7 Coresignal Alternatives for Business Intelligence Data
- Top 5 Anthropic Web Search Alternatives of 2025
Bright Data for HackerNoon
- Market-Aware Agents Need Instant Knowledge Acquisition, Not the Latest Model (Ghostwriting)
- From RAG to Instant Knowledge Acquisition: Giving Market-aware Agents Access to the Live Market
n8n
N8n is a low-code automation tool that helps developers save time by creating stunning automations. Read my articles:
- How to make a Slack bot: Python vs. n8n Guide
- 12 workflow automation tools to automate your workflows
- Getting started with CRM automation: Essential guide & templates included
- Top 7 Embedded iPaaS Solutions: Choosing the Right Fit for Your Organization
- Top 8 open-source Zapier alternatives for workflow automation
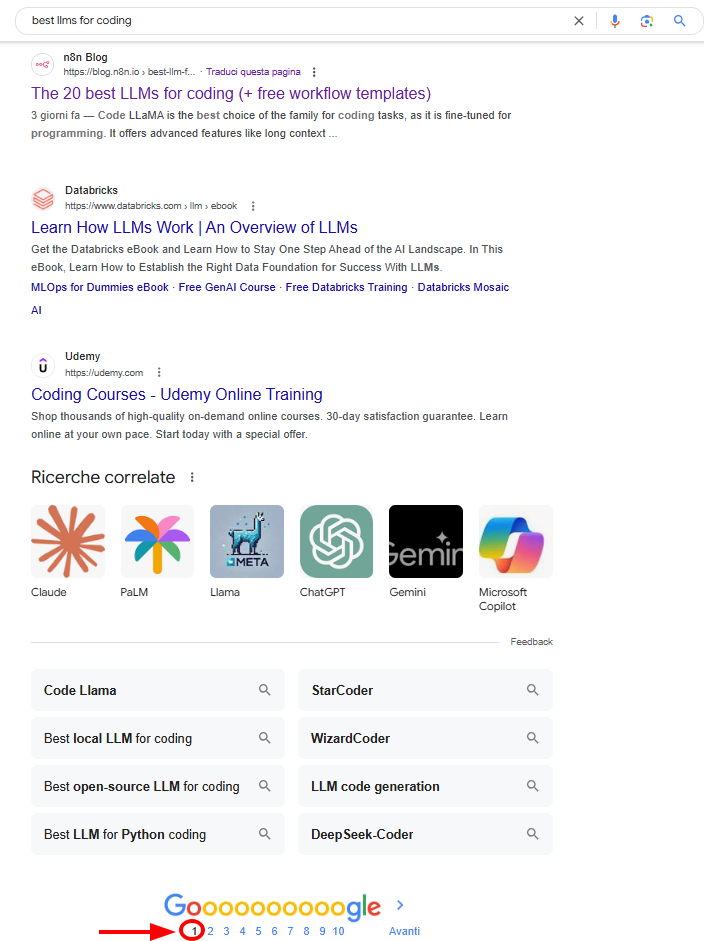
- The 20 best LLMs for coding (+ free workflow templates)
- 15 Practical AI Agent Examples to Scale Your Business in 2025
“The 20 best LLMs for coding (+ free workflow templates)” ranked in the first page in Google for several weeks:
Towards Data Science
With tens of published articles, I started my Technical Writing career by collaborating with the established publication Towards Data Science.
I have published articles about Python programming, statistical concepts for Data Scientists, and Machine Learning. Below is the list of my best articles:
- How to Convert a CSV file into an XLSX one with Python and Pandas
- How To Deal With Missing Values in Data Science
- How to Perform Feature Selection in a Data Science Project
- How To Detect Outliers in a Data Science Project
- How to Effectively Start Coding in the Era of ChatGPT
- How To Solve Python Dependency Issues With Anaconda On Windows
- Loops and statements in Python: A deep understanding (with examples)
- Python Loops: A Complete Guide On How To Iterate in Python
- Python Classes Made Easy: The Definitive Guide to Object-Oriented Programming
- Mastering Modular Programming: How to Take Your Python Skills to the Next Level
- Python Lists: The Definitive Guide for Working With Ordered Collections of Data
- Leveraging the Power of “5S” for Clean and Reusable Code
- What is the Difference between a Barplot and a Histogram?
- Two Methods for Performing Graphical Residuals Analysis
- The Difference Between Correlation and Regression
- Understanding l1 and l2 Regularization
- What is a Trained Model?
- 5 Python Libraries to Learn to Start Your Data Science Career
- Mastering the Art of Regression Analysis: 5 Key Metrics Every Data Scientist Should Know
- Make Your Tabular Data Stand Out via CLI With These Tips and Tricks
- Please: No More Flipping Coins in Data Science
- Mastering Linear Regression: The Definitive Guide For Aspiring Data Scientists
- The Myth Of p-values: Why They’re Not the Holy Grail in Data Science
- Classification Metrics: The Complete Guide For Aspiring Data Scientists
- Unleashing the Power of Prompt Engineering for Data Scientists
- The Data Scientist’s Toolbox: Leveraging scikit-learn’s Top Features for Success
- A Gentle Introduction To Generative AI For Beginners
- Use Pandas Data Frames More Effectively with the Top 7 Column Operations
- Beyond Numpy and Pandas: Unlocking the Potential of Lesser-Known Python Libraries
- Building Interactive Data Visualizations in Python: An Introduction to Plotly
The Web Scraping Club
The Web Scraping Club is a weekly Substack about web scraping, with news, examples, tutorials, and code from Pierluigi Vinciguerra. Read my articles:
- Optimizing Python Scripts for High-Traffic Websites
- The Framework That Won’t Quit: Scrapy’s Continued Relevance in Data Extraction
- Comparing Residential And Mobile Proxies for Anti-Bot Evasion
- Machine learning models for detecting bot detection triggers
- Predictive Analytics Using Scraped Data
- How Reverse Proxies Route and Protect Web Traffic
- Beyond the DOM: A Practical Guide to Web Data Extraction with LLMs and GPT Vision
- Scraping Amazon Product reviews - Part 1
- Scraping Amazon Product reviews - Part 2
- Implementing Anomaly Detection on Scraped Datasets
- Fine-Tuning LLMs for Industry-Specific Scraping
- From Scripts to Agents: The Evolving Career For Web Scraping Professionals
- Analyzing Scraped Data With Pandas And Matplotlib
- Building A Scraper Dashboard Using Streamlit
- Using AI to Detect Patterns in Scraped Data
- Using NLP for Entity Extraction From Scraped Data
- Best Practices for Ethical Web Scraping
- Using Python’s Async Features for High-performance Scraping
- Understanding robots.txt and its Implications
- How to Avoid Copyright Violations While Scraping
- Kadoa: Simplify Your Scraping Workflows with Automation and AI
- Stop Getting Blocked: Upgrade Your Scraping Infrastructure with Dolphin{anty}
- Data Scraping for Market Research: A Developers Guide
The Web Scraping Club for Apify
Apify is the world’s largest marketplace for web data extraction, automation, and AI tools. In collaboration with The Web Scraping Club, I worked on the state of web scraping report 2026. As it was teamwork, I focused on the following sections:
- Market overview
- Proxy usage
- Infrastructure
In particular, I analyzed the data for these sections and wrote the paragraphs. Read the report:
You.com
You.com develops best-in-class APIs for searching the web, making LLMs effectively usable to users. Read my articles:
FloppyData
FloppyData is a proxy provider. Read my articles:
- Types of Proxies: Which One Is Best?
- What Are Mobile Proxies? How Do They Work & How to Use Them?
- Setting Up FloppyData Proxy With Selenium in Python
Codemotion
Codemotion is an Italian firm that helps developers grow. Read my articles for the English magazine:
- Unsupervised Learning in Python: A Gentle Introduction to Clustering Techniques for Discovering Patterns
- Data Analysis Made Easy: Mastering Pandas for Insightful Results
- Python and Databricks: A Dynamic Duo for Data Dominance
- Python: The Versatile Programming Language That Captivates Everyone
Read my articles for the Italian magazine:
- Creative Coding: Come Creare Opere d’Arte Programmando
- La gestione degli errori resa semplice: una introduzione in Python
- Apprendimento Non Supervisionato in Python: Una Introduzione alle Tecniche di Clustering per Scoprire i Pattern
- Python e DataBricks: la giusta accoppiata per dominare i dati
- L’analisi dei dati resa semplice: padroneggia Pandas per ottenere risultati dai tuoi dati
- Come programmare con Python: Il linguaggio versatile che conquista tutti
Codemotion for Istituto Poligrafico Zecca dello Stato e Politecnico di Bari
I contributed to writing an article on a study made by Istituto Poligrafico Zecca dello Stato and Politecnico di Bari about the creation of a knowledge graph of the whole Italian regulatory database:
Semaphore CI
Semaphore helps technology companies achieve better results. Read my articles:
- How to Handle Imbalanced Data for Machine Learning in Python
- Flaky Tests in Machine Learning: Challenges and Countermeasures
- Unlocking Efficiency: 3 AI Tools for Automatic Software Documentation
- Keeping Self-Hosted LLM Costs Down: Best Practices and Tips
- Unit Testing vs. Integration Testing: Test Automation Basics
- The Best AI Coding Assistants For 2025
- How to Use AI to Reduce Technical Debt
Stack Abuse
Stack Abuse is a firm that helps developers through programming tutorials and courses. Read my articles:
- Python Dictionary Comprehension: A Fast and Flexible Way to Build Dictionaries
- The Power of Indexing: Boosting Data Wrangling Efficiency with Pandas
- Data Integrity: How OrderedDict Preserves Key Order in Python
- Finding Numbers in Various Data Types in Python
Expanso
Bacalhau is a platform for fast, cost efficient, and secure computation that enables users to run compute jobs where the data is generated and stored. Read my articles:
- Bacalhau v1.7.0 - Day 2: Scaling Your Compute Jobs with Bacalhau Partitioned Jobs
- Bacalhau v1.7.0 - Day 4: Using AWS S3 Partitioning With Bacalhau
- Kubernetes vs Nomad vs Bacalhau: Which Orchestrator is Right for Your Data?:
- Your Fast Track to Bacalhau: Local Development via Docker-in-Docker
- Why 80% of Your Data Should Never Hit the Cloud
- Why Cloud-Centric Architectures Are Breaking Under Data Scale
Kestra
Kestra is an orchestration tool that simplifies business-critical workflows. Read my articles:
- How Orchestration Can Optimize Your Engineering Processes
- Kestra vs. Popular CI/CD Tools: When to Choose an Orchestration Solution
AppSignal
AppSignal has recently opened its doors to Python articles. Read my articles:
- Ways to Optimize Your Code in Python
- How to use Lambda Functions in Python
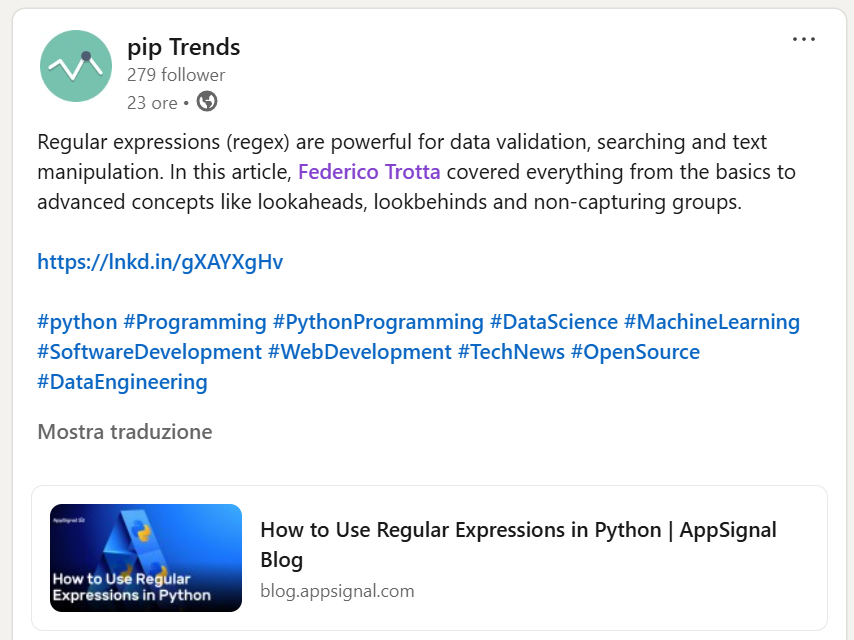
- How to use Regular Expressions in Python
- An Introduction to Flask-SQLAlchemy in Python
- An Introduction to Testing in Python Flask
- Using JWTs in Python Flask REST Framework
- Flask or Django: Which One Best Fits Your Python Project?
- How to Use MongoDB in Python Flask
- How to Avoid N+1 Queries in Django Python
- How the Application and Request Contexts Work in Python Flask
- How to Use Redis with Python
- Improve Query Performance Using Python Django QuerySets
“How to use Regular Expressions in Python” has been featured and mentioned by pip trends on LinkedIn:
“An Introduction to Testing in Python Flask” has been featured and mentioned by pip trends on LinkedIn:

DZone
I had the privilege to co-author the following articles with Karin Wolok:
- An Introduction to Stream Processing
- Choosing The Right Stream Processing System: A Comprehensive Guide
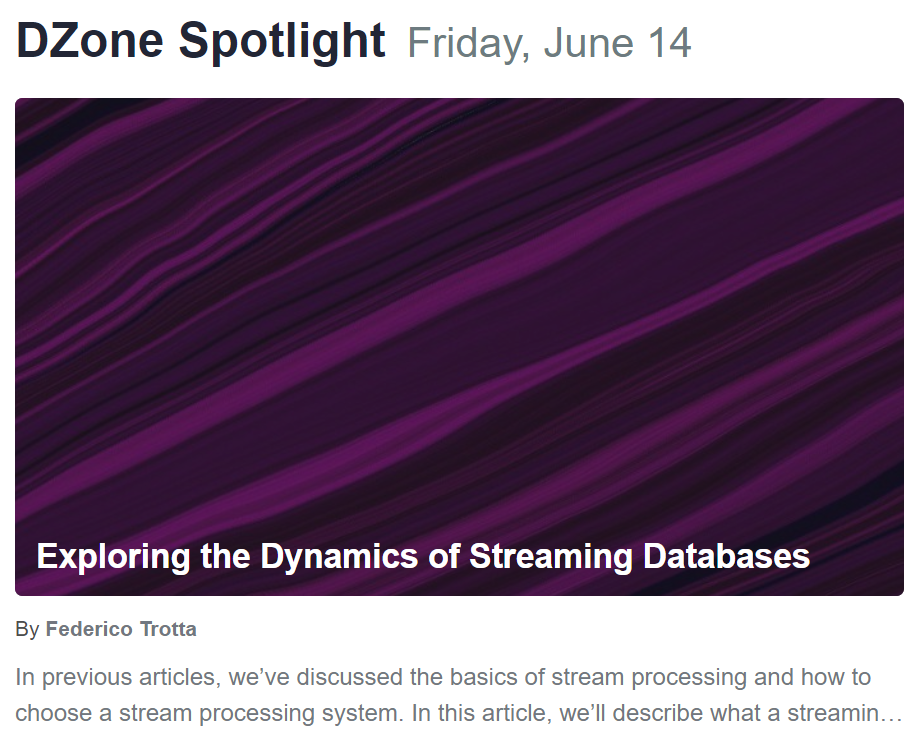
- Exploring The Dynamics of Streaming Databases
“Exploring The Dynamics of Streaming Databases” has been featured as DZONE’s top article in the daily digest newsletter.
“Exploring The Dynamics of Streaming Databases” has also been featured on the DZone main page on the 14th of June 2024 as a spotlighted article:
Dev.to
Dev.to is “A constructive and inclusive social network for software developers”. Read my articles:
- Serverless Cost Optimization: Three Key Strategies
- Pandas
reset_index(): How To Reset Indexes in Pandas - How To Easily Remove a Password From a PDF file
- How To Create a Repository in GitHub
- How to calculate RGB values in Python
- How to Use Proxies in Python
Butler Scientifics
Below is my contribution to Butler Scientifics, a Spanish firm developing AutoDiscovery, a software that automates the discovery phase when analyzing data:
Planeta ChatBot
Planeta ChatBot translated into Spanish and published on their website some of the articles I wrote for Towards Data Science. Read my articles for Planeta Chatbot.
Business.com
I had the privilege to help business.com refactor an article about web scraping with Powershell by provide insights on my experience. Read the article:
KdNuggets
KDnuggets repurposed some of the articles I wrote for Towards Data Science: read them here.
I’ve also been featured here and mentioned there.
Technical Documentation
This section provides examples of documentation bases I worked on, subdivided by client.
Adaline
Adaline is the single platform for product and engineering teams to iterate, evaluate, deploy, and monitor prompts for AI products. For this collaboration, my job was to re-engineer and restructure the documentation, as well as create new content, particularly for all the pillars (iterate, evaluate, deploy, and monitor).
Read the documentation I worked on:
Xpander
Xpander is an agentic AI platform that allows you to build, train, and deploy agentic frameworks easily and safely. I have currently created and documented an agent called “Weekly Changelog Maintainer”:
Dectar
As the only Technical Writer in the firm, I had the honor and the responsibility to define the structure of the documentation, both in English and Italian. In particular, my job was to provide documentation for customers and internal documentation.
Products documentation
When I started this collaboration, there was some documentation but this was a task performed only by the Support Team. I rearranged, polished, and engineered the existing content to help users better understand the products, and started creating new documentation.
Dectar develops two digital products:
- ACSIA: a cyber security solution that helps you prevent cyber attacks.
- ACSIA CRA: a cyber security solution that evaluates your infrastructure’s exposure to the internet.
Note: My job with Dectar was to provide standardization and best practices, while revamping the pre-existing documentation and creating the new one. After about a year of collaboration, the team had all the instruments to create the documentation on their own as the most important milestones where accomplished through my work.
Internal documentation
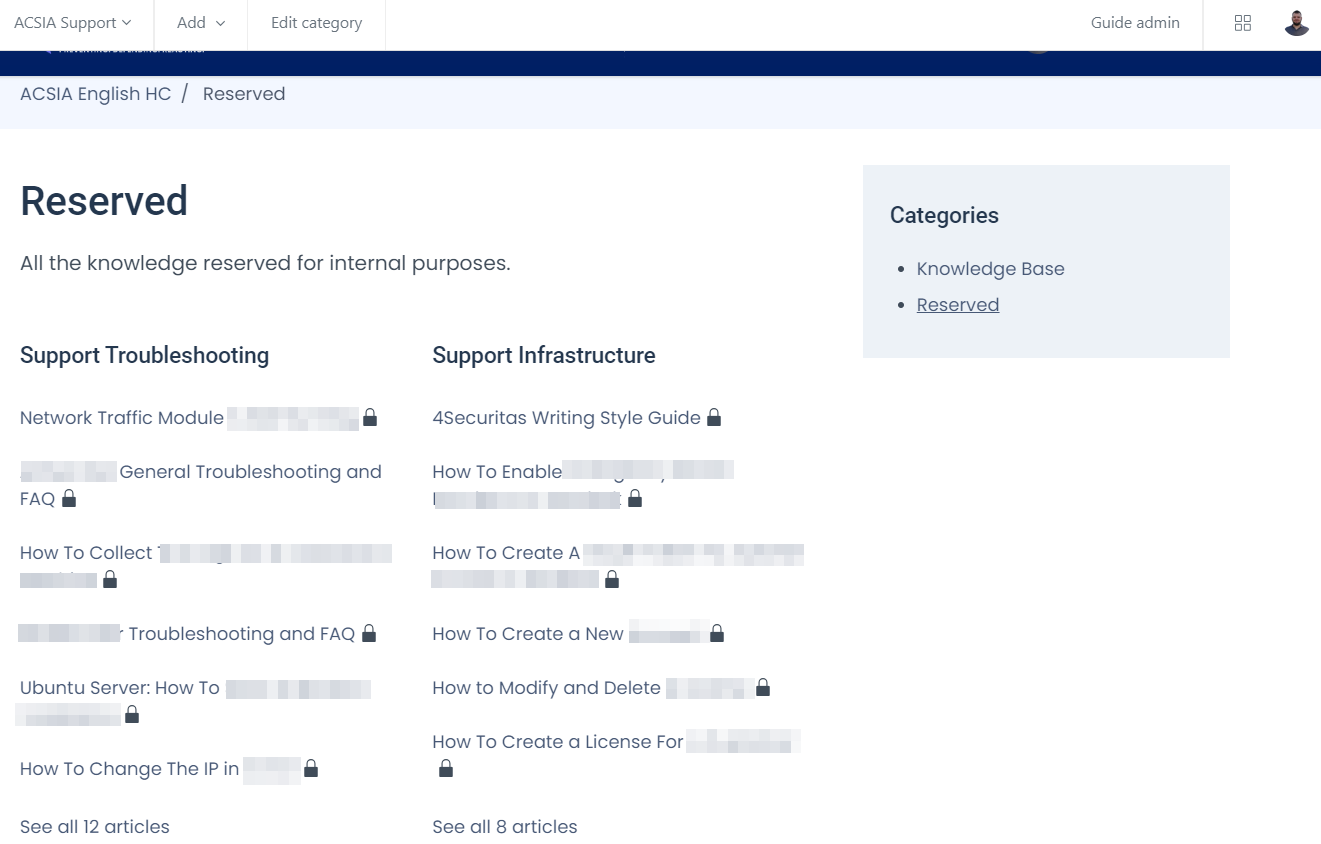
I created comprehensive internal documentation to ensure all teams are up-to-date with Dectar solutions. Especially, I helped the Support Team keep track of the troubleshooting by writing internal procedures. Here’s how I worked:
- I created the structure of the documentation, dividing the topics into two:
Support InfrastructureandSupport Troubleshooting. The Infrastructure section has articles regarding knowledge or procedures. The Troubleshooting section has only articles regarding procedures on how to solve troubles internally:
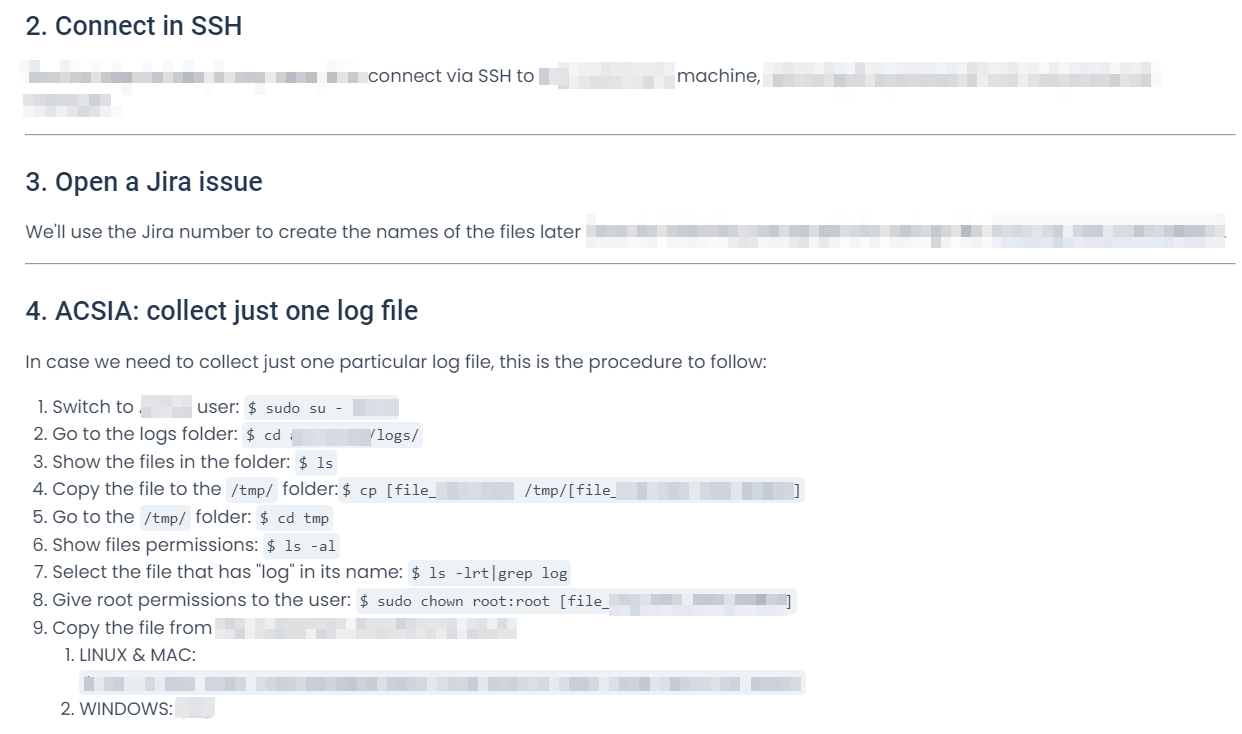
- I structured the articles as step-by-step procedures, providing code and scripts as needed:
SQLBI
SQLBI is a company that focuses on DAX. It created and developer several products related to DAX and some of them have their own “sub-company”. For this collaboration, I contributed to the documentation of Dax Optimizer and Calendar Pro.
Documentation for Dax Optimizer
I’ve contributed to creating the documentation for DAX Optimizer: a software that performs a static analysis of DAX measures in a Power BI or Analysis Services model to improve teir performance.
As I started the collaboration, the company already created some documentation in a docs-as-code environment.
I re-engineered the pre-existing documentation, by implementing best practices and standards, and created new documentation for missing parts.
Read the documentation of Dax Optimizer.
Documentation for OKVIZ
I contributed to the documentation of Calendar Pro: an integration for Power BI that enhanches the visualization for dates.
Read the documentation for Calendar Pro.
Temera
Temera is an Italian company, leader in IoT solutions for the Fashion/Luxury & Retail sector.
I created the documentation for their digital products and teams. In particular for:
For each product, I created:
- The user manual
- The APIs documentation
- Internal documentation (Architecture diagrams, processes and procedures, etc…)
The documentation is for users who buy the products or for internal use, so it is not publicly available.
De Agostini
DeAgostini is the world leader in collectibles.
As the only Technical Writer, I’m contributing to design and create their internal documentation to improve their employee experience in their daily tasks.
The next subsections provide the details of what I’m documenting for DeAgostini.
The CMS Documentation
DeAgostini developed internally a Content Management System (CMS) from scratch because there were no market solutions that could satisfy 100% their needs.
I documented:
- The architecture.
- The dashboard management.
- What are the pages and how to manage the content.
- How to manage the products inside the pages.
- How to publish the content.
This documentation has been developed having in my the end user that, in their case, is mainly the Marketing Team. In other words, they developed the CMS from scratch so that the Marketing Team has custom software to advertise their products.
Responsys Documentation
They use Responsys to create marketing automation campaigns. It has good documentation, but it’s mainly feature-oriented and lacks use cases, so I documented how end users, that is the Marketing Team, can use it to:
- Create email campaigns.
- Create programs to automate the email campaigns.
I gave it the following structure:
Getting started with Responsys
- How to log in to Responsys.
- The process behind automated email campaigns that is creating:
- The email, per country.
- The automation program.
Managing campaigns
- How to create a new email campaign.
- How to fill in the fields, in a standardized way.
- The auto-checks to control (users have to verify that some boxes are automatically checked).
Managing automations
- How to create a new automation program and what documentation to read from the Responsys website.
- A standardized way to show how the tens of active programs work.
Jira’s Customer Portal Documentation
DeAgostini uses Jira to manage internal tickets for internal requests.
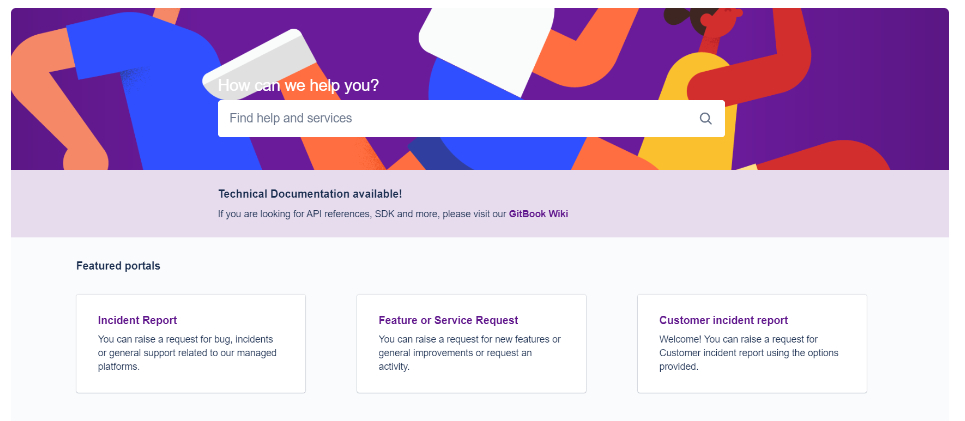
I documented:
- How to log in to the platform.
- How to choose between an Incident Report, a Feature or Service Request, or a Customer Incident Report.
- How to fill in all the requested fields in a standardized way to improve the communication between internal departments. For example, we decided how and when users have to define if a task is urgent or not, for every kind of request.
APIs Documentation
This section shows how I document APIs.
For some of my clients, I documented APIs for internal use only. So, in such cases, the sections below report only partial code. Furthermore, the code is refactored and created differently from the actual API.
You.com
you.com is an enterprise AI platform powered by your data. I’ve been working on the documentation of their API with the goal of restructuring and improving it, helpig developers solve their daily jobs using it.
Read the documentation I worked on:
Zendesk API: OAuth Tokens Management Documentation
This section describes how I created use cases in Python for the Zendesk API and how I documented them.
I created a Python program for a customer that uses the Zendesk API to manage access tokens. They needed a program that could manage access tokens on behalf of their customers to help the support team in their daily tasks, making customers do some operations for them.
The complete program and documentation can’t be shown, so, in this section, I recreated some of the functions, with different code, to show how I document APIs.
Prerequisites
To use the code in this section, you first need to have a Zendesk subdomain registered.
Here’s the API reference with its documentation for further basic knowledge.
Create an API token
After gaining a Zendesk domain with an admin account, you can create an API token as follows:
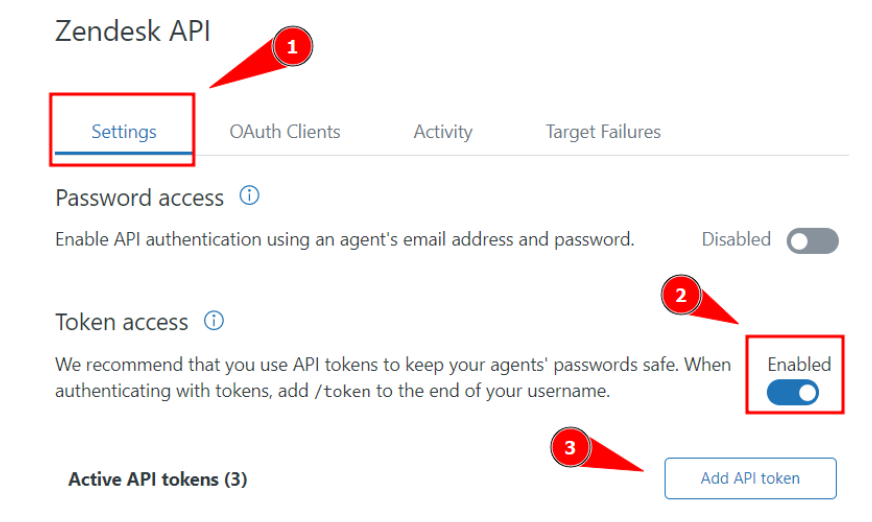
Step 1: Log in to your Zendesk account and go to the Admin Center
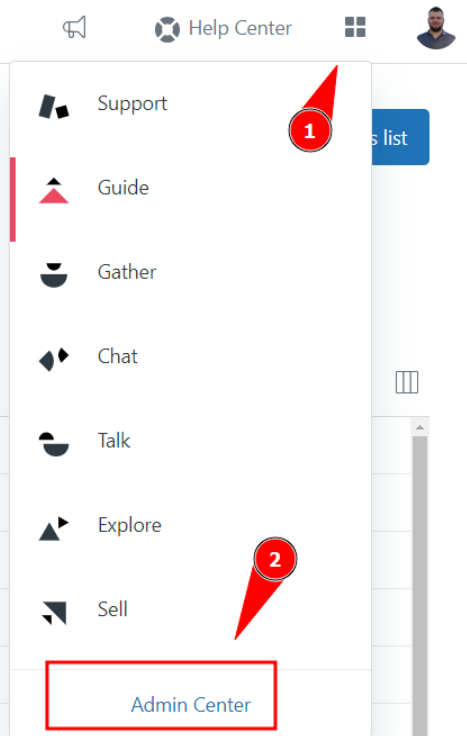
Step 2: Click on Apps and integrations and then on Zendesk API
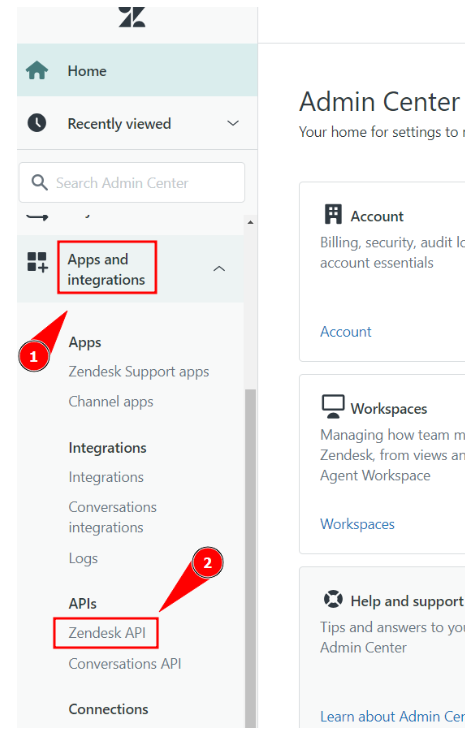
Step 3: Click on Settings. Then, enable the Token access. Finally, click on Add API token
Copy and paste the API token somewhere safe: it won’t be shown again.
Save and you’re done.
Python prerequisites
To run the program you need:
- Python 3 or later.
- The library
requests.
Since the library requests is not in the Python standard library, you need to install it via the command:
pip install requests
Use cases implementation
This section shows documentet Python code as use cases for the Zendesk API.
Admin authenticator
If you’re working with colleagues, each colleague can be an admin, create an admin API token, and use the program.
The admin authenticator program is called initial.py. It asks you for your:
- Your Zendesk login email.
- API token.
After authentication, it creates a file called settings.py that stores your:
- Zendesk login email.
- API token.
- Client ID.
You’ll provide your email and API token via CLI. The client ID is retrieved by the software automatically.
Below’s the Python code:
import requests

# Define the Zendesk subdomain
ZENDESK_SUBDOMAIN = "" # Write your Zendesk subdomain

# Insert user email
email = input(f"\nPlease, insert your Zendesk login email:\n")
# Insert user API token
token = input(f"\nPlease, insert your Zendesk API token:\n")

def generate_settings(email, token)->None:
    """ Generates the settings.py file needed to use the main program"""
    # API request
    url = f'https://{ZENDESK_SUBDOMAIN}.zendesk.com/api/v2/oauth/clients'
    auth = (email + '/token', token)
    headers = {
    	"Content-Type": "application/json",
    }

    try:
        # Get response
        response = requests.get(url, auth=auth, headers=headers)
        # Get the clients in the JSON response
        number_of_ids = len(response.json()["clients"])

        # Iterate to get the client ID
        for id in range(number_of_ids):
            print(response.json()["clients"][id]["id"])
            client_id = response.json()["clients"][id]["id"]
    except Exception as e:
        print(e)

    # Write credentials to settings.py file
    with open("settings.py", "w") as settings_file:
        settings_file.write(f'EMAIL = "{email}"\n')
        settings_file.write(f'CLIENT_ID = "{client_id}"\n')
        settings_file.write(f'API_TOKEN = "{token}"\n')
        settings_file.close()
    print(f"\nSuccesfully created your settings file!")

if __name__ == "__main__":
    generate_settings(email, token)
How to create an OAuth token
This program retrieves the information of an admin stored in the settings.py file and:
- Gets authentication to the Zendesk API.
- Creates an OAuth token.
Your customers can use the OAuth token in other Python files you have written to authenticate them to the Zendesk API and make some actions on your behalf.
For example, you may want to write a Python file that retrieves the logs on a customer machine and loads them on a Zendesk ticket; let’s call it operator.py. To load them on a Zendesk ticket you need to authenticate your customer and you can safely do so via a OAuth token.
Below is the code:
import base64
import json
import requests
import settings


# Define the Zendesk subdomain
ZENDESK_SUBDOMAIN = "" # Write your Zendesk domain

# Retrieve info from the settings file
email = settings.EMAIL
token = settings.API_TOKEN
client_id = settings.CLIENT_ID
auth = (email + '/token', token)

def generate_token(client_id:str, auth:str)->base64:
    """Creates an OAuth Token for the Zendesk API"""

    # API request to generate a new token
    url = f"https://{ZENDESK_SUBDOMAIN}.zendesk.com/api/v2/oauth/tokens.json"

    headers = {
        "Content-Type": "application/json"
    }

    data = {
        "token": {
            "client_id": client_id,
            "scopes": ["read", "write"]
        }
    }

    response = requests.post(url, headers=headers, json=data, auth=auth)

    # Get token ID
    oauth_id = str(response.json()["token"]["id"])
    # Get full token
    oauth_token = str(response.json()["token"]["full_token"])

    # Insert ticket number
    zendesk_ticket_number = input(f"Insert the Zendesk Ticket number: ")

    # Mix ticket number, token id, and full token
    clear_text_msg = f"{zendesk_ticket_number}:{oauth_id}:{oauth_token}"
    # Encode the mixed values
    encoded_msg = base64.b64encode(clear_text_msg.encode('utf-8')).decode('utf-8')

    # Return the mixed values
    print("\nHere's your new token!\n")
    return encoded_msg

if __name__ == "__main__":
    generate_token(client_id, auth)
How to revoke active OAuth tokens
When you create OAuth tokens, they will remain stored in the web server, taking space.
It is a good practice to revoke all the active tokens, from time to time.
The following program revokes all the active tokens:
import json
import requests
import settings


# Define the Zendesk subdomain
ZENDESK_SUBDOMAIN = "" # Write your Zendesk domain

# Retrieve info from the settings file
email = settings.EMAIL
token = settings.API_TOKEN
client_id = settings.CLIENT_ID
auth = (email + '/token', token)

def revoke_all_tokens(auth:str)->None:
    """Revokes all the OAuth Tokens generated for the Zendesk API"""

    # API request to revoke all the tokens
    url = f"https://{ZENDESK_SUBDOMAIN}.zendesk.com/api/v2/oauth/tokens.json"

    headers = {
        "Content-Type": "application/json"
    }

    response = requests.get(url, headers=headers, auth=auth)

    # Calculate the number of existing tokens
    number_of_tokens = len(response.json()["tokens"])

    # Store response to a variable
    response_json = response.json()

    # Iterate to revoke all the existing tokens
    for arrayn in range(number_of_tokens):
        token_id = response_json["tokens"][arrayn]["id"] # Get token id
        url = f'https://{ZENDESK_SUBDOMAIN}.zendesk.com/api/v2/oauth/tokens/{token_id}.json'
        response = requests.delete(url, auth=auth) # Revoke tokens

        # Verify response
        try:
            if response.status_code == 204:
                print("\nAll the tokens been revoked!\n")
            else:
                print("\nThere was a problem while revoking the tokens!\n")
        except Exception as e:
            print("\nAn exception occurred: ", e)

if __name__ == "__main__":
    revoke_all_tokens(auth)
Beam API: Training a Machine Learning model on a serverless GPU
Beam is a service that provides Data Scientists and Developers the possibility to run code on a serverless GPU, utilizing their REST API.
I had the possibility to collaborate with them to their documentation, creating a use case that describes:
- What are serverless GPUs and why they’re revolutionizing the world of data in terms of development.
- How to log in and install the beam CLI on a Linux machine (or, via WSL in Windows).
- A use case on how to train a Machine Learning model on the Beam serverless GPU, using its API.
Read the complete use case here.
CoinGecko API: getting crypto values
This section describes a use case for the CoinGecko API.
This use case has been developed by me in Python and the full code is on my GitHub.
Prerequisites
To use the CoinGecko API you first need to create an account on their website.
Then, you need to create an API token. The free plan currently allows you to make 10k API calls per month.
Requirements
The program uses the match statement that, and, at the time of writing this documentation (November 2023), this requires Python 3.10 (or newer versions).
As the program calls an API, you also need the requests library. You can install it via:
pip install requests
Getting started
When you use this software you need to launch the initial.py file via:
python3 initial.py
This will create a file, called settings.py, which stores your email and your API token: this way, every time you use this software, you won’t need to insert them.
After that, you can launch the main file via:
python3 main.py
Here’s how the initial.py file works (code reference here):
- The user inserts the email and the API KEY via CLI.
- The program checks if the
settings.pyfile exists in the settings folder, then:- If exists, it warns the user that the file already exists.
- If it doesn’t exist, it creates it and stores the email and the API KEI inserted by the user.
Structure of the main file
After the first usage, always invoke the main file via:
python3 main.py
Here’s what it does:
- It imports the email and the API token from the
settings.pyfile. - It prints a welcome message reporting the version of the software.
- It tries to authenticate the user.
- With a
whileloop, it has a menù that gives the user to choose between three options:- Option 1: the user can visualize the price of one crypto in a currency of their choice. Also, the user can choose to store the value of the crypto in a CVS file with the current date.
- Option 2: the user can visualize the difference between today’s and yesterday’s price of a crypto.
- Option 0: it closes the program by breaking the loop.
Here we document all the functions used.
The authentication function
The authentication function authenticates the user by verifying their email che API token.
This is a use case of the GET/ping method shown in the documentation.
This method has no parameters and returns 200 if the authentication is successful.
In Python, we can test it as follows:
# Try access by pinging the dedicated URL
try:
    ping_url = "https://api.coingecko.com/api/v3/ping"
    response = requests.get(url=ping_url, auth=auth)
    if response.status_code == 200:
        print(f"\nAccess succesfully granted to the API!")
    else:
        print(f"\nAn error occurred while autenticating. Please: try again!")
except Exception as e:
    print(f"\nAn exception occurred:", e)
Were the authentication is performed from the email and the API token imported from the settings.py file like so (complete code reference here):
# Import settings from the settings file
email = settings.EMAIL
token = settings.API_TOKEN
auth = (email + "/token", token) # Create authenticator
The price module
This module has two functions that retrieve the price of a currency using the API and make some calculations.
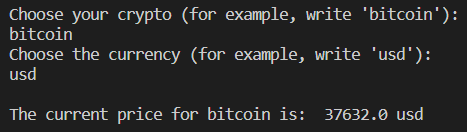
The function visualize_price() calls the API using the GET/simple/price method.
Here’s how this method can be used to show the current price of one crypto with respect to a currency:
def visualize_price(auth:str)->None:
    """Shows the current price of a crypto with respect to a currency.
    The auth variable is created in the main.py file.
    """
     # User inserts crypto and currency
    crypto = input(f"\nChoose your crypto (for example, write 'bitcoin'):\n")
    currency = input(f"Choose the currency (for example, write 'usd'):\n")

    # API call
    url_price = f"https://api.coingecko.com/api/v3/simple/price?ids={crypto}&vs_currencies={currency}"

    response = requests.get(url=url_price, auth=auth)

    # Print current price of a crypto in the selected currency
    try:
        if response.status_code == 200:
            data = response.json()
            print(f"\nThe current price for {crypto} is: {data[crypto][currency]: .1f} {currency}")
        else:
            print(f"An error occurred while getting the price: please, try again!")
     except Exception as e:
        print(f"An exception occurred while trying to get the currency value", e)
For example, suppose we want to know the current price of bitcoin in USD. Here’s what you’ll see:
The function price_change() calls the API using the GET/coins/{id}/market_chart method.
Here’s how this method can be used to calculate the current price of a crypt with respect to a currency and its yesterday’s price. We can also calculate the change in price during the day and print it:
def price_change(auth:str)->None:
    '''Shows the difference of the price of a crypto in a currency with respect to the value it had yesterday.
    The auth variable is created in the main.py file.
    '''

    # User inserts crypto and currency
    crypto = input(f"\nChoose your crypto (for example, write 'bitcoin'):\n")
    currency = input(f"Choose the currency (for example, write 'usd'):\n")

    # API call
    url_increment = f"https://api.coingecko.com/api/v3/coins/{crypto}/market_chart?vs_currency={currency}&days=1&interval=daily"

    response = requests.get(url=url_increment, auth=auth)

    try:
        if response.status_code == 200:
            data = response.json()
            current_value = data["prices"][1][1]
            yesterday_value = data["prices"][0][1]
            change_price = current_value - yesterday_value
            print(f"\nThe current value of {crypto} is {current_value: .1f} {currency} while yesterday's value was {yesterday_value: .1f} {currency}.\nSo, the price has changed by {change_price: .1f} {currency} from yesterday")
        else:
            print(f"An error occurred while getting the price: please, try again!")
    except Exception as e:
        print(f"An exception occurred while trying to get the currency value", e)
For example, suppose we want to know the price of Ethereum in EUR. We’d get the following:
Note that the response to the GET call is the following:
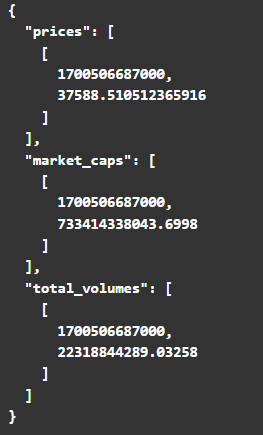
This is why the slicing used is:
current_value = data["prices"][1][1]yesterday_value = data["prices"][0][1]
The cvs_creation module
This module has two functions:
- The function
new_csv()creates a CSV writing the header, if it doesn’t exist. - The function
write_data()writes the current value of a crypto in a currency on the current date.
Using the main file
The main file is built as a menu with two options:
- Option 1 writes the current value of a crypto and stores its value in the CVS, if the user wants-
- Option 2 prints the difference in the value of a crypto between today and yesterday.
Let’s show how the software is expected to work:

Presentations for Conferences
This section reports presentations for conferences I created for my customers.
Project Elevate
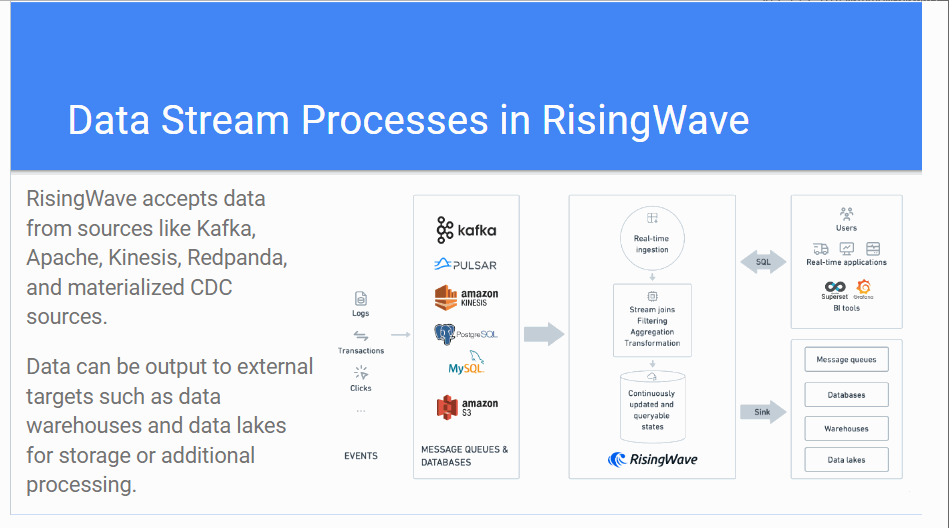
I had the pleasure of working with Project Elevate on a project regarding documentation to be presented to “Big Data London” at a seminar for Risingwave.
The seminar was titled “REAL TIME AND HISTORICAL NLP-ENRICHED MARKET DASHBOARD WITH RISINGWAVE AND CHAT-GPT”:
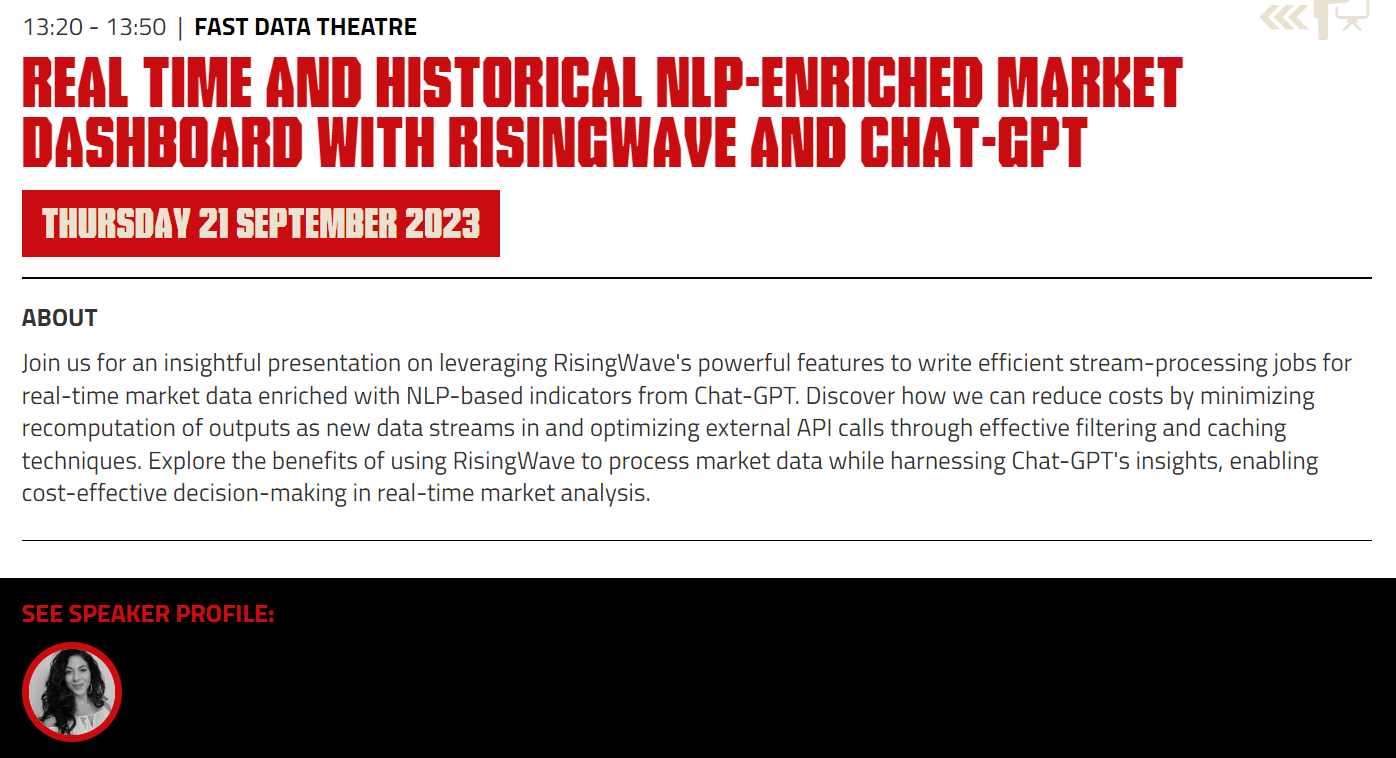
The seminar attendee - Karin Wolok, CEO of Project Elevate - presented the documentation I created. This is about how to use Rising Wave for efficient stream processes in real-time data together with ChatGPT, to enrich the real-time data stream, with the objective to predict the stock market.
Below is the front page of the documentation I created for the seminar:

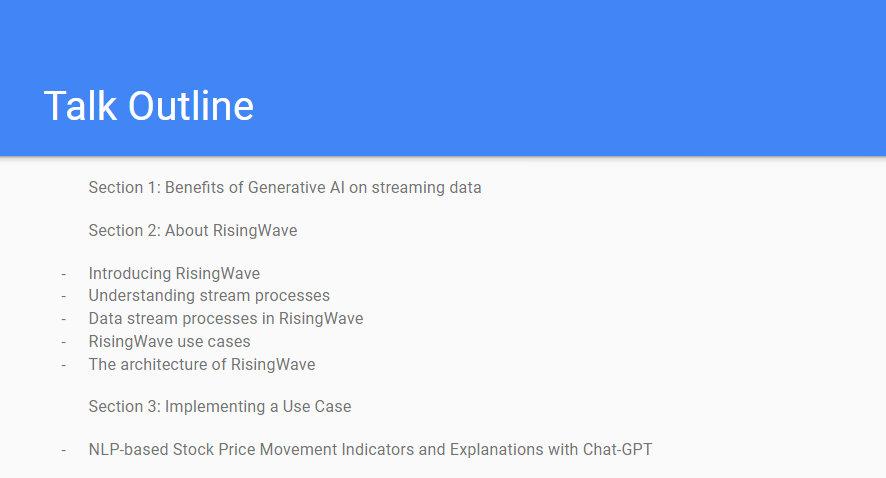
The talk outline:
Below is a GIF showing some parts of the documentation I created: